W.A.L.E.S Solutions
Dashboard | Contestants | Events | Event Settings | Manage Events | Judging | Reports | Setup | Demo Files Readme | Win | Mac
EVENTS
Events Tab: (Figure 1) Works the same as the Contestant Tab. To add an event you press the ![]() button. You then type in the event Number, Event Name, etc. Depending on the type of event you are conducting there are several fields that need to be modified if your Event has several categories.
button. You then type in the event Number, Event Name, etc. Depending on the type of event you are conducting there are several fields that need to be modified if your Event has several categories.
NB: If you don't see your event number wait until it appears before moving on to adding your next event.
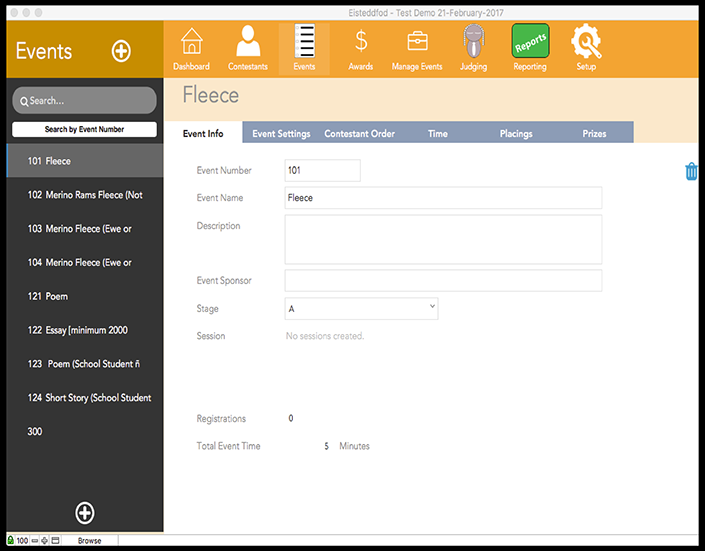
– Event Number: It is best to use Numbers from 101- however many Events there are. If there are several different events you may like to break the numbering and leave some spare numbers. Eg: 101 to 141 There are 41 Events in Section 1 Start Section 2 at 151- etc.
Why? Because most of us are volunteers and not all that expert typists. It is quicker and easier to type 101 rather than GC 001.
Event Name: This is the Name of the Event. Eg: Chocolate Cake.
Description: This may have some more details Eg: Uniced - Not Packet Mix.
Event Sponsor: Sponsors Name.
Stage: Section or class eg Cooking or Section Eg: A
Sessions: Not currently active.
Registrations: Indicates the number of competitors in the event.
Total Event Time: If setup indicates the amount of time this event will take.
–Alpha and Numerical Numbering: (Figure 2) When using Alpha Characters to get section to be in order you may have to add a “0” after the Alpha Character depending on the number of events in that section. Filemaker sees the characters as A1, A10,A11, A2,A21etc. by placing the “Zero 0” after the Alpha character the numbers will line up e.g.: A01, A02, A03.....etc.
– Recommended Numbering: (Figure 2B) The “Eisteddfod” is designed to use running numbers for events for best efficiency. It is easier for your data imputer to put 10 in rather than R010. We highly recommend if you are going forward with the “Eisteddfod” program that you change your events to numerical numbering only. The numbering does not have to be consecutive, you can have different sets of numbers for each section. e.g.: Section A has 30 events, depending on where you would like to start “Section A” could be 101 -130, “Section B”, 25 events, could be 141-165 and so on.
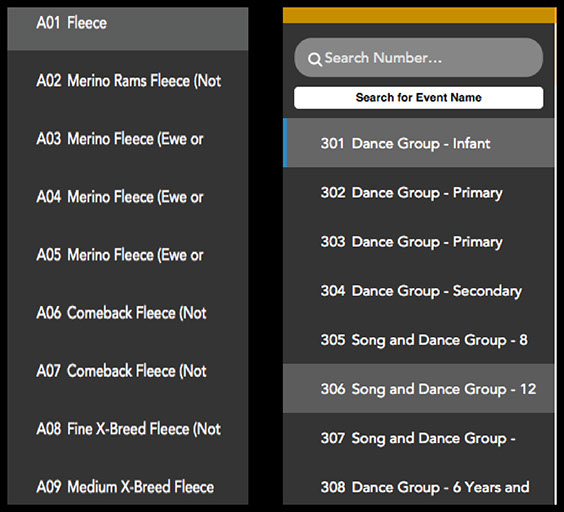
(Figure 2) (Figure 2B)
–Search Function: Default is by “Number” just type in the event Number and it will be found. You will need to highlight “Search Function” to access the event. You can also search by “Name” Click on the Search by name bar which will then allow you to type the event name into the search bar. You can type all or part of a name into the search field. E.G.: if you type in “Fleece” all the fields with the word “Fleece” will be found regardless of where the word is in the “Event Name”.
–Add an Event: To add an event you simply select the button and fill out the fields as required.
–Event Name: This is the “Event Name” in your schedule or program.
–Description: This is the Event Description. (Figure 3). A more detailed description of event.

(Figure 3)
–Event Sponsor: If the event is sponsored the sponsor can be listed here.
–Session: Yet to be designed.
–Registrations: The number of competitors/Entries in the event.
– Total Event Time: This is used to calculate the time taken for the event if the times are specified in “Event Settings”
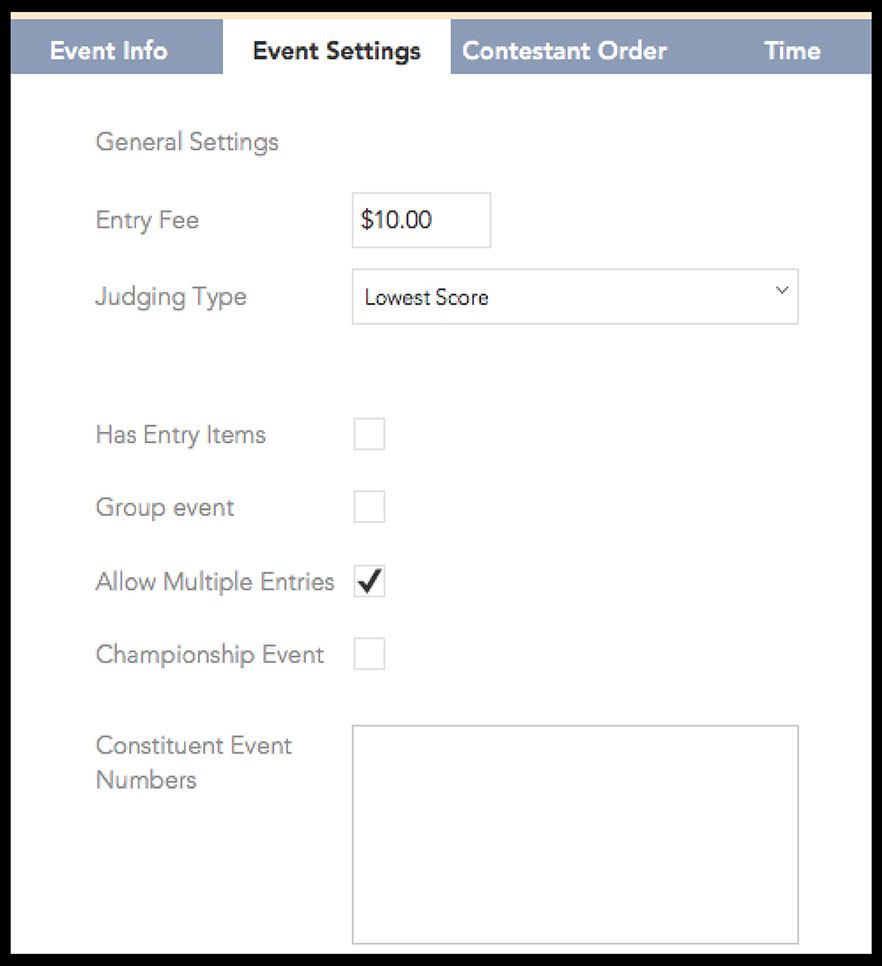
Event Settings
– General Settings: This where the settings are set of the event.
– Entry Fee: The entry fee of the particular event. (Figure 4)
(Figure 4)
– Judging Type: Can be set as either Highest or Lowest Score. If using 1st, 2nd, & 3rd, fastest time etc. you would set the “Judging type to Lowest Score” if using highest score (e.g.: out of 100) then set to Judging Type “Highest Score”.
–Has entry Items: Refers to second layer in "Contestants" if there is details here.
–Group Event:
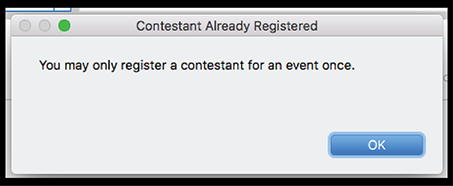
– Allow Multipule Entries: Depending on the type of event this may be ticked if a competitor enters multipule entries in the event; it is also a safe guard if the competitor is only allowed to enter in the event once. It will flag that the contestant has already entered. This is a great feature if you have several people imputing data. (Figure 5)
(Figure 5)
If your Competition has events where multipule entries can be entered and events where there can only be one entry this can be changed here by ticking or unticking this box. (Figure 4)
– Championship Event: Tick this if your event is a Championship.
– Constitute Event Numbers: If you have a number of events that qualify you to go forward to the next event you enter the event numbers here. This can be in the form of putting the event numbers in the box in a column format. (Figure 6) or in your spreadsheet you can put the start and finish event numbers separated by a hyphen “-” in the spreadsheet. (Figure 6B)
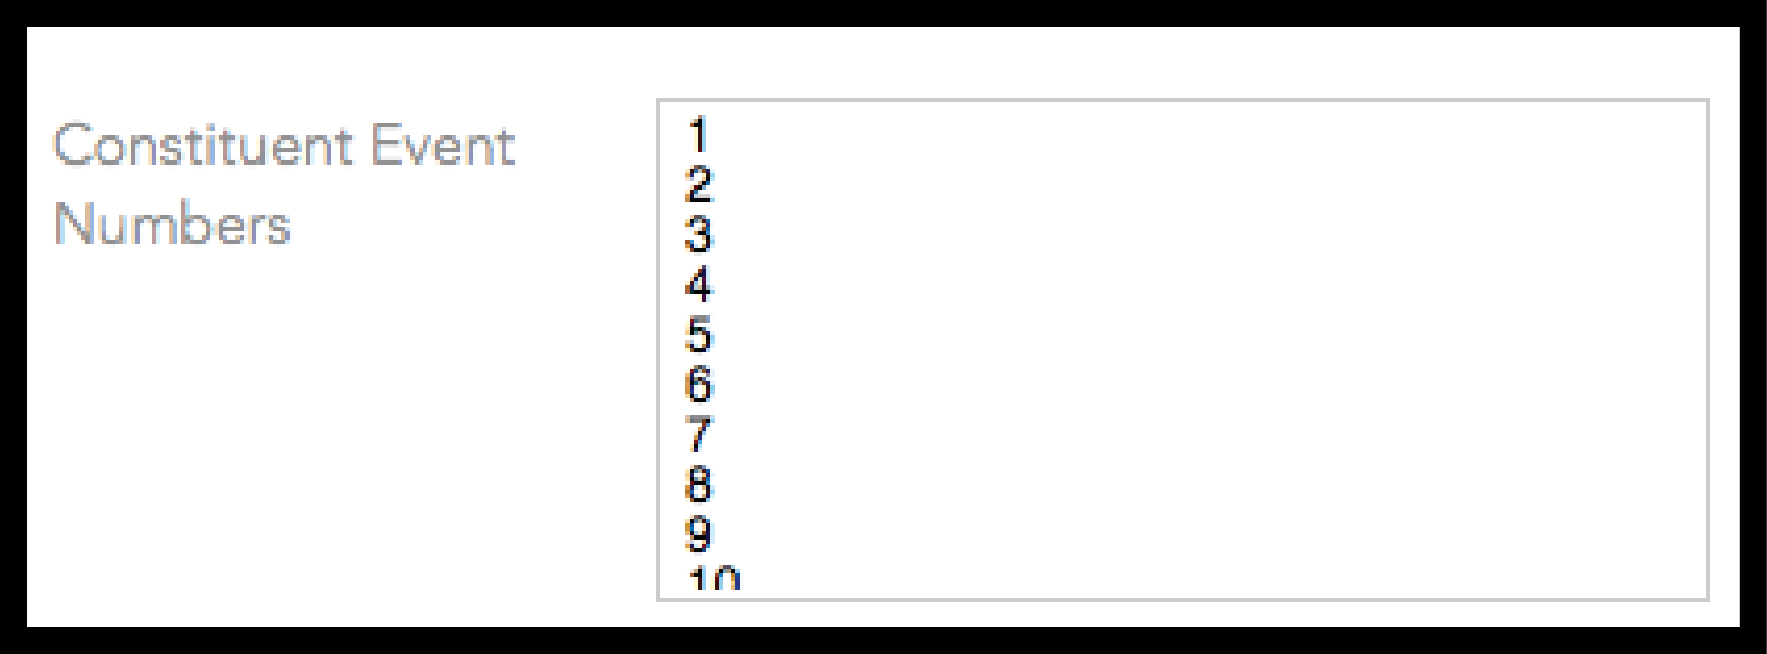
(Figure 6)
Spread sheet row. (Figure 6B)
 (Figure 6B)
–Advertisements: This will be dealt with under Reports.
Contestant order
– Link Arrow: The small blue arrow ![]() to the right of Order when selected and clicked will return you to the contestant section.
to the right of Order when selected and clicked will return you to the contestant section.
– Contestant Order: Allows you to see how many contestants are in a given event. Allows the organisers to change the order of the competitor. (Figure 7)
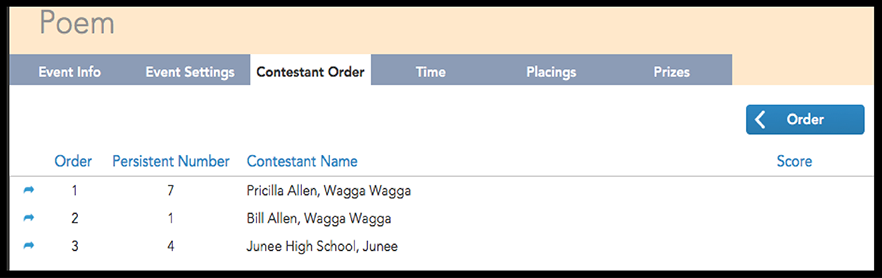
(Figure 7)
– Order: To change the order of a contestant simply change the Order of the competitor by changing the “Order Number” then go to the “Order” tab and select sequence. This will update your order.
– Randomise: your competitors by simply selecting “Order” Randomise. This will change the order of the competitors. Handy when the same competitor is entered first in many events and you would like to change the order.(Figure 8)
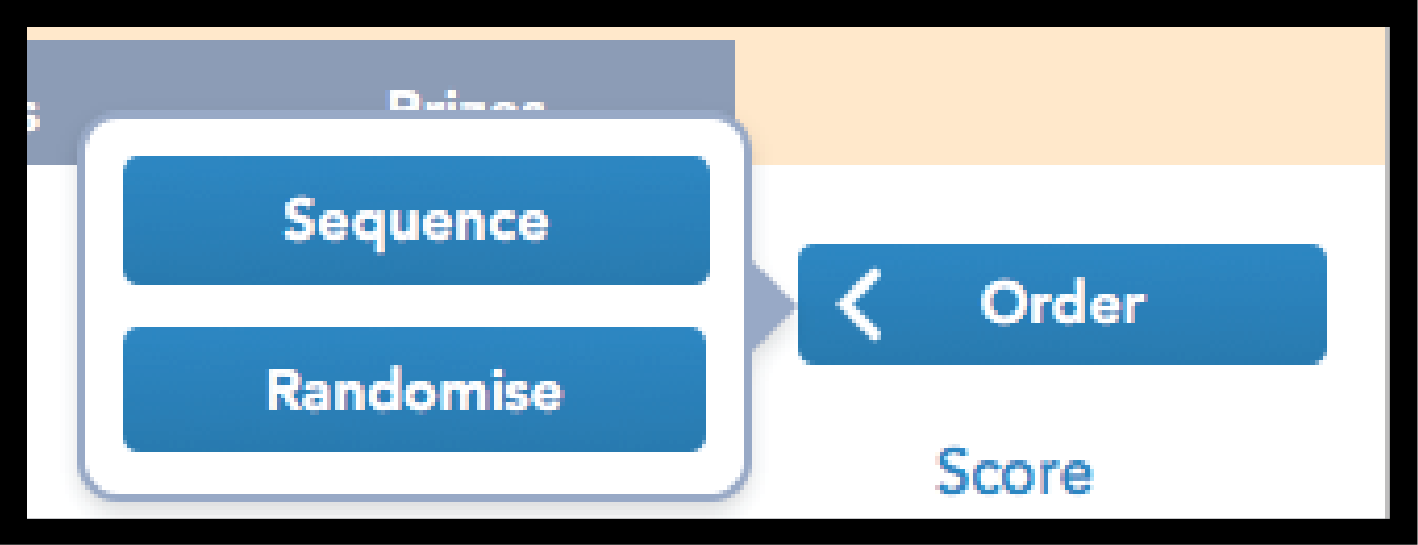
(Figure 8)
– Sequence: If a competitor has been deleted the "Sequence will need to be updated. If Contestant 3 is deleted out of the event, the program needs to be updated by clicking the sequence button.
–Persistent Number: If selected in “Setup”, this is the Competitor number. Each competitor is given an number on entry. This is a unique number. This helps identify contestants when being judged.
Once the event has been judged the scores will appear in the Score column. (Figure 3)
(Figure 9)
 (Figure 9)
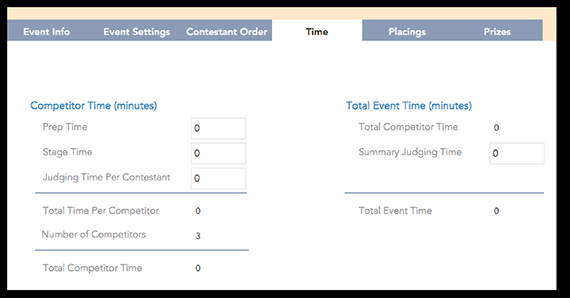
Time
– Time: This is where you can work out how long a event will take. If your program has a default time these can be done in “Setup” spreadsheet. They can also be done here. (Figure 10) and is especially applicable to “Eisteddfod’s”.
– Prep Time: Time taken for setup e.g.: Choirs, Bands etc...
– Stage Time: Time taken to compete in the event in minutes.
– Judging Time: Time taken by the judge to Judge each individual contestant.
– Total Time Per Competitor: Sum of above.
–Total Event Time (minutes): Total of Competitor Time carried forward from “Competitor Times”
–Summary Judging Time: At completion of event best guess of the time the judge will take to announce place getters and hand out prize money.
–Total Event Time: This is the summary of Total Competitor Time and Summary Judging Time.
(Figure 10)
Placings
– Placings: This shows the placings of all the competitors and their results. If you are scoring each competitor then the scores will be shown (Figure 11). If using 1st, 2nd, 3rd then only those scores will show.
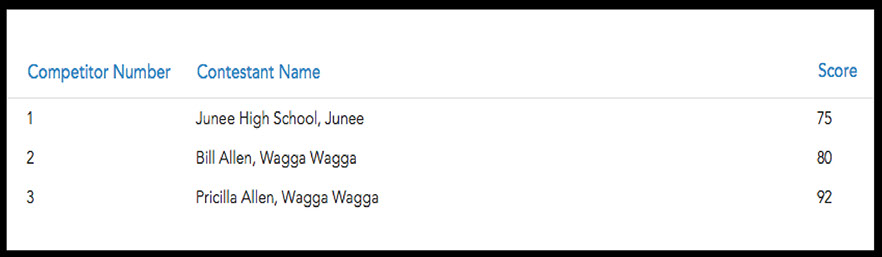
(Figure 11)
Prizes
– Prizes: Pre-Judged: Shows the prizes and sponsors associated with the event. (Figure 12)
and post Judging shows the place getters.
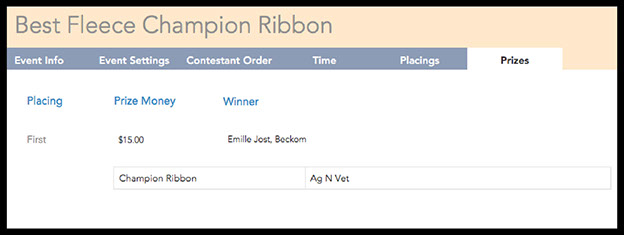
(Figure 12)
If you have a large number of events then you can open a spreadsheet program and open the Event Template which is available in the setup tab.
This allows you to set up your event and import it into Eisteddfod.

Menu